MY NEW CRAFT AND PASSION!
Jake is already sick of hearing me talk about this, and I am (obviously) soo excited about it, I have to bring it to you, my internet friends. Plus, I took more pictures than necessary.
I'm making candles! Beeswax ones! I love love love beeswax candles, but they are so expensive! You know what's cheaper? Buying beeswax and then making them yourself. Plus, it's fun.
However, beyond the rolled beeswax candles we made for the wedding, I haven't really ever made candles. However, I have watched a youtube video or two, so I figured I could trouble shoot whatever I needed to.
Very first, I had to figure out how to get the huge hunk of wax (not pictured) into smaller, melt-a-ble chunks. A hammer and old chisel did the trick on that score.
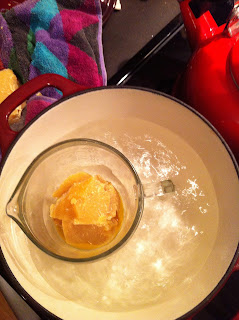
Then, I gave a chipped measuring cup new life as my wax cup. Perfect! I knew that wax should be melted in a double-boiler-kind-of-way, and that in theory, the method of putting a glass measuring cup in boiling water should work (I don't have a double boiler + if I did I wouldn't want it to get waxy, probably), but I had never done it.


I'm making candles! Beeswax ones! I love love love beeswax candles, but they are so expensive! You know what's cheaper? Buying beeswax and then making them yourself. Plus, it's fun.
However, beyond the rolled beeswax candles we made for the wedding, I haven't really ever made candles. However, I have watched a youtube video or two, so I figured I could trouble shoot whatever I needed to.
Very first, I had to figure out how to get the huge hunk of wax (not pictured) into smaller, melt-a-ble chunks. A hammer and old chisel did the trick on that score.
Then, I gave a chipped measuring cup new life as my wax cup. Perfect! I knew that wax should be melted in a double-boiler-kind-of-way, and that in theory, the method of putting a glass measuring cup in boiling water should work (I don't have a double boiler + if I did I wouldn't want it to get waxy, probably), but I had never done it.

So I waited and peered anxiously into the cup repeatedly. For a LONG time. I could barely tell it was working!

But it was! You can see it start to melt in the picture above.
And then, it was melted! Now, what to stir with? I first looked for a camping spoon, knowing that whatever I put in there probably would only ever be used for wax henceforth, but the only one I could find was Jake's and he'd be mad, so I went with a disposable chopstick. Perfect!

Time to pour it into jars. Exciting. The jars I used here are from the wedding. They are old creme brulee containers that I found in a really neat re-purposed art store in Vancouver. I bought 30 of them, so there will be more candles made like this in the future :)

Ok, the wax is in! Now the wick! Just cut some and stick it in there, easy peasy. Except at this point I realize that I'm going to have to hold it there till the wax hardens enough. And we all know I am not that patient.

I figured that I could maybe tie it to something above, to hold it up straight, but the initial wick was too short, so I pulled it out.

There we go! Salad dressing and second chopstick to the rescue! Balancing the chopstick was a little tricky, as you can see.

Then I realized that the first wick was now hardening and would hold itself straight up! Plus, I could stick the bottom to the jar and it wouldn't move around! Genius. Of course, once I poured more hot wax into the jar, the wax coating on the wick softened again and it threatened to fall over. Stirring chopstick to the rescue!

Then I had a little wax left, but not enough for another candle, so I made a beeswax/oil combo for treating our cutting boards and salad bowl. You can buy this kind of thing at kitchen stores for a lot of money. My uncle makes it for his cutting boards, so I called him to get the proportions and got an earful of '71 grams of wax to 1 cup of mineral oil = 4 small jam containers' but since I didn't want that much and also don't have the means to measure my wax in weight, I just made it up.

Basically I poured the leftover wax into some oil, figuring I can add more oil later if necessary. Looks good, eh? That's before the wax is melted, clearly.

And here are the finished candles! Don't they look great? I've asked Jake that about 30 times already (I made them last night), and he is having trouble matching my enthusiasm. I guess I can't blame him. He doesn't know that in the store one candle like that would EASILY be 10 dollars, and I made two for about $6, including the cost of the glass.
I declare this experiment a success. Can't wait to make more.

They're beautiful! And they must smell great too.
ReplyDelete